A timelapse of driving our RV, a Tiffin Allegro Bus motorhome, 255 miles from Elberfeld, Indiana to Sullivan, Missouri.
RV
Posts featuring the coach.
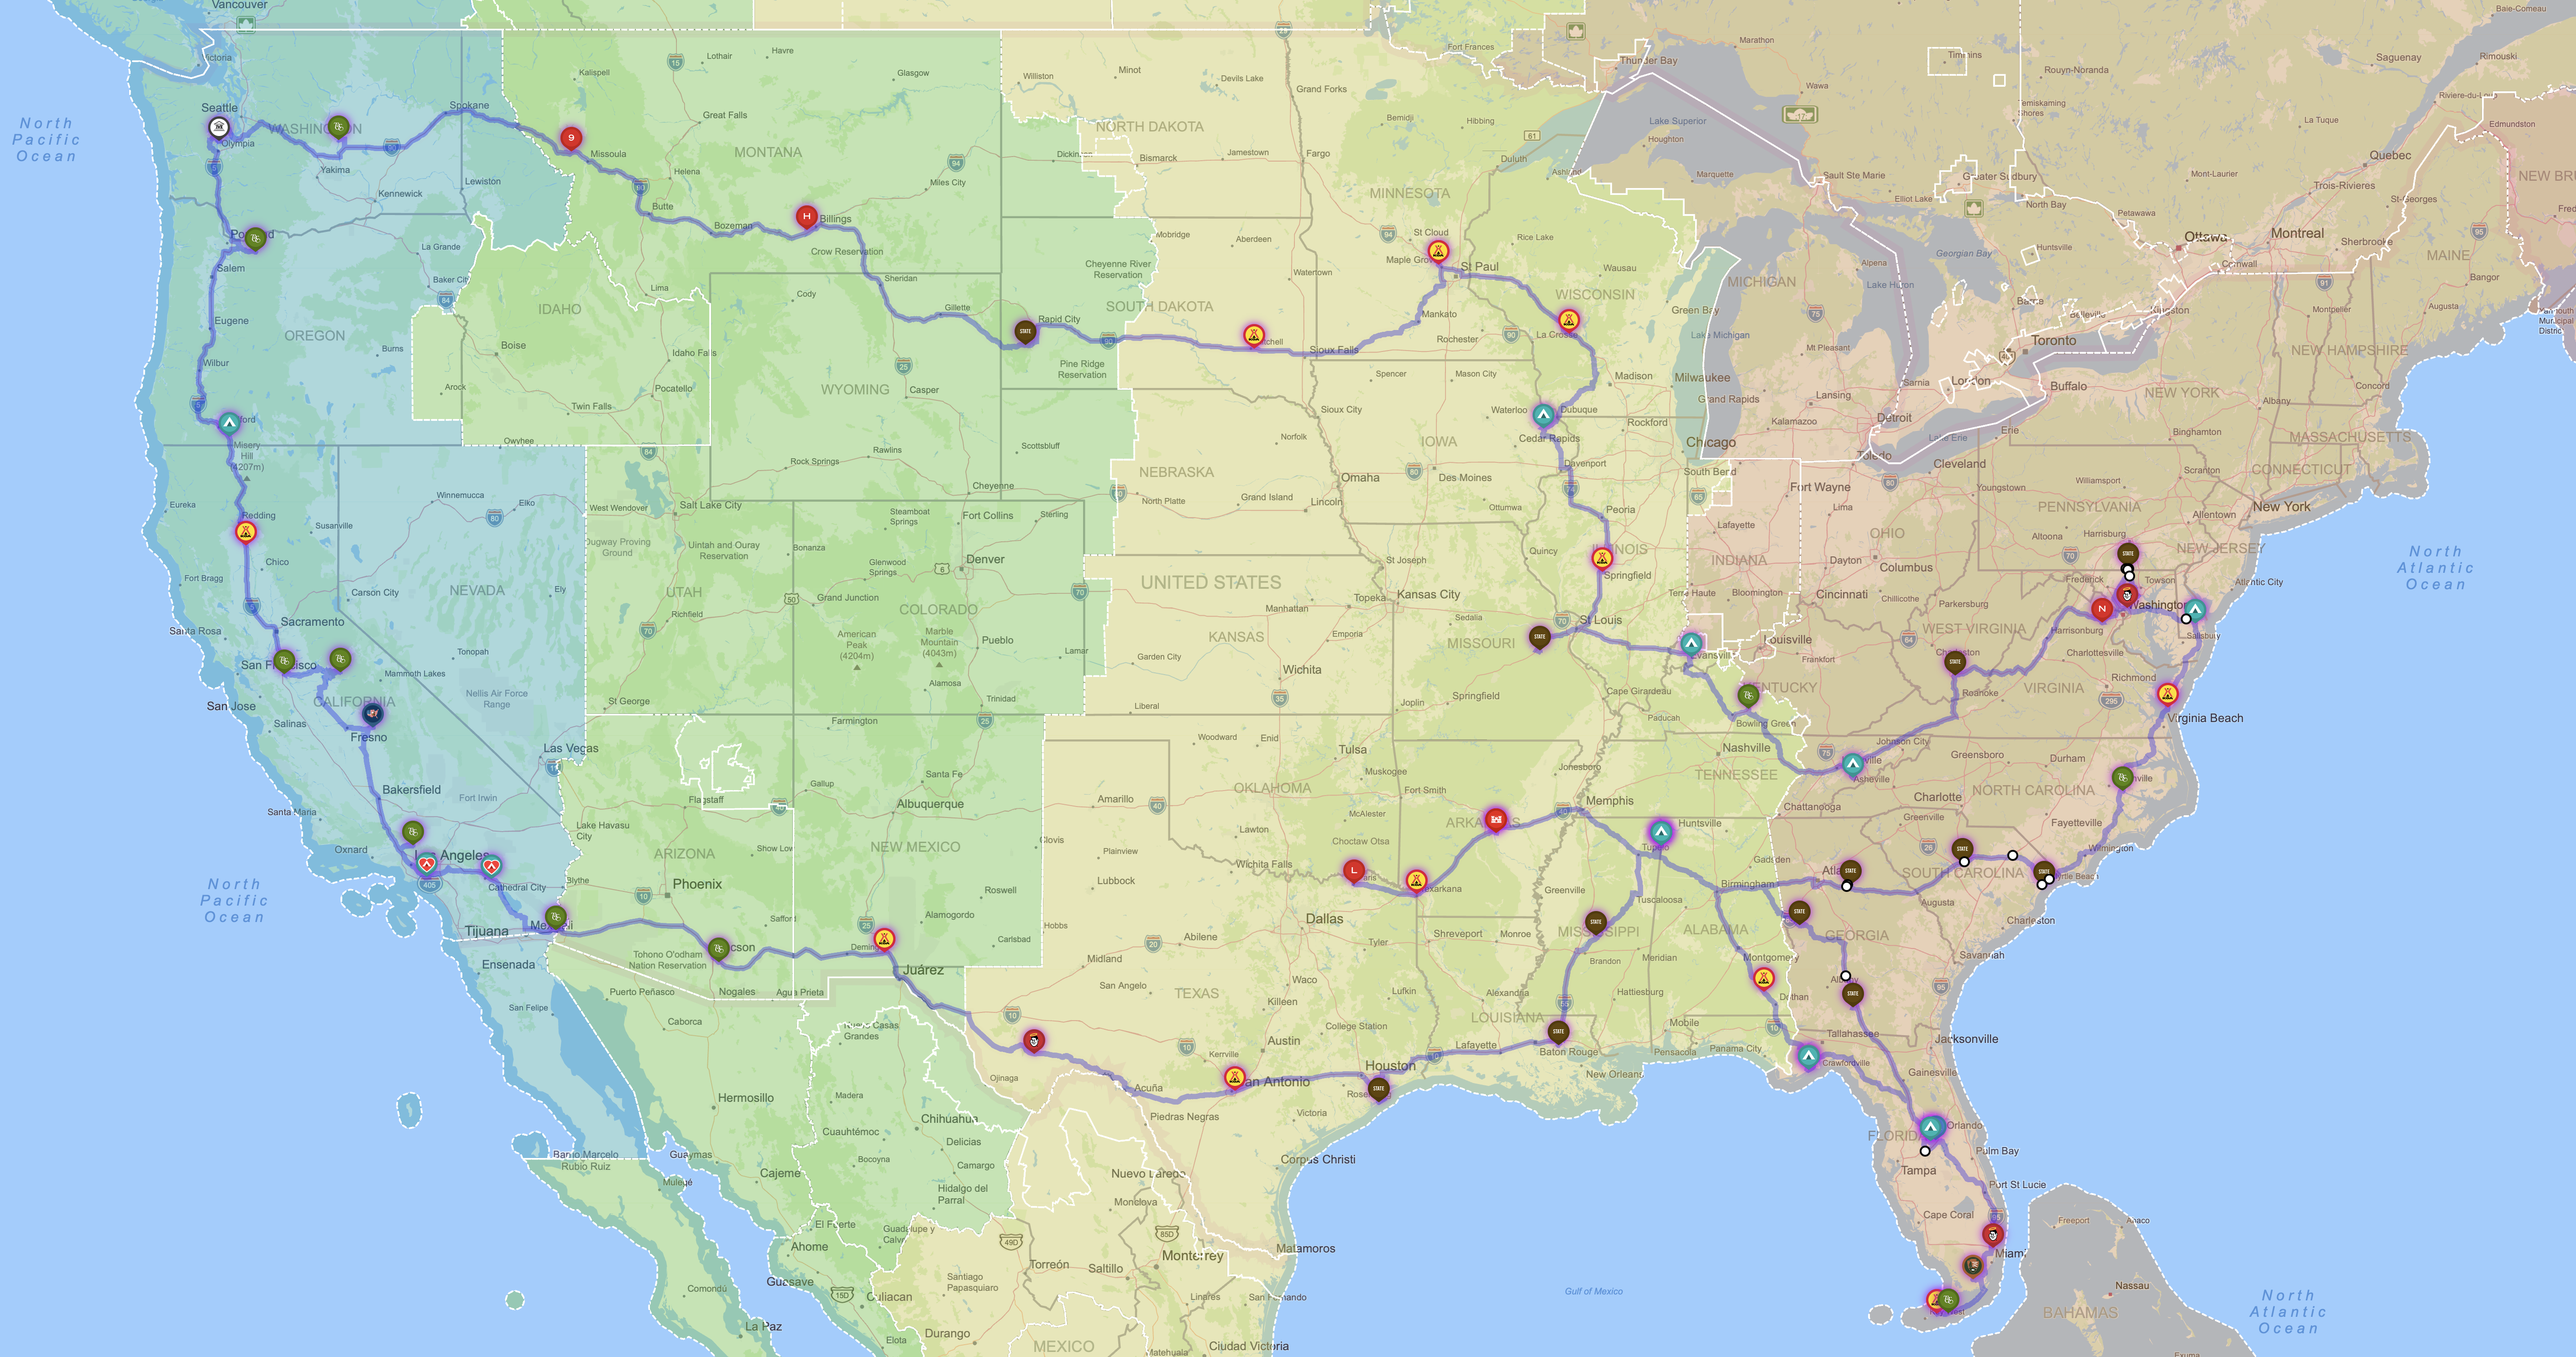
Travel from Elberfeld, Indiana to Sullivan, Missouri
We drove our coach 255 miles, about five hours of driving, from Elberfeld, Indiana to Sullivan, Missouri.
Here’s a map showing our route, heading west:

An interactive map:
Water lilies:

Heading on to I-69 North:

Pulling up a yellow stripe:

Love’s fuel stop:

87.122 gallons of diesel for $367.57; we saved $58.42 off that pump price via our fuel discount card:

Bridge roadworks:

Wabash River:

“Welcome to Illinois”:

We haven’t seen a pump jack for a while:

More bridge roadworks:

Rest area:

Crossover roadworks:

An interestingly shaped trailer (a mobile stage):
")
Another rest area:

A sign that says “After 11 hours driving, you need 10 hours rest”; we prefer to drive only two hours, but will go up to six on interstates, and stay at least one night when “sprinting”, preferably one to two weeks:

Our first glimpse of the Gateway Arch:


“Missouri Welcomes You”:


Six Flags theme park, yep, with six flags out front:


Approaching our destination, Meramec State Park:


Our site:

Miles Landing Campground
We stayed at Miles Landing Campground in Elberfeld, Indiana. (Campground Reviews listing.)
A one night stop on our journey home, but we would have been happy to stay here longer.
Dates:
- Check in: 2024-07-12
- Check out: 2024-07-13
- 1 night
Weather:
- Cloudy, light rain
- High temp 89°F, low 70°F
- Negligible wind, gusts to 11 MPH
Noise:
- No road noise
- No train horn noise
- No neighbor noise
Site:
- #4, pull-through, gravel
- Didn’t need to disconnect toad, and didn’t
- Mostly level site, a little high in the front; used air leveling, since only one night
- Gravel driveway about 70 feet long by 15 feet wide
- 20 feet to neighbor on passenger side; about 50 to neighbor on driver side
- Picnic table
- Fire pit
- Some small trees
- Clean site
Utilities:
- 50 amp power, conveniently located
- 60 PSI water, conveniently located
- Didn’t use sewer connection, but conveniently located (1 10-foot pipe would be needed)
Internet (in usage priority order):
- T-Mobile: 60 Mbps down, 50 Mbps up, 70 ms ping
- AT&T: 160 Mbps down, 60 Mbps up, 90 ms ping
- Verizon: 11-70 Mbps down, 2-25 Mbps up, 30 ms ping
- Starlink: not used
- Campground Wi-Fi: none?
Amenities:
- Garbage dumpsters
Our review on Campground Reviews:
Lovely spot for a quick stop
This is a nice campground not far from the interstate but far enough away that you don’t hear it. Our pull-through site was long enough that we didn’t need to disconnect our tow vehicle, which was very convenient for a short stay. We also enjoyed the nice view of the pond and wetlands below the campground. We camped at Miles Landing Campground in a Motorhome.
Tip for Other Campers: Your GPS will lie to you about the road leading to the campground and where to turn….
Campground map:

An interactive map:
Our site:


Other sites:


Pond view:

A nice campground; we would be happy to stay again, and for longer.
Video: Park City, Kentucky to Elberfeld, Indiana motorhome travel timelapse
A timelapse of driving our RV, a Tiffin Allegro Bus motorhome, 165 miles from Park City, Kentucky to Elberfeld, Indiana.
Travel from Park City, Kentucky to Elberfeld, Indiana
We drove our coach 165 miles, about three hours of driving, from Park City, Kentucky to Elberfeld, Indiana.
Here’s a map showing our route, heading northwest:

An interactive map:
Toading up:

I-65 South:

Bridge:

Fun with zoom:

Exit to a service area:

Huck’s service plaza:


Lunch:

“The Journey is My Home”; that could be our motto:

Back to our coach:

I-165 North:

We had a fun new issue: we turned on our generator while driving, so we could run our air conditioners, it being rather hot. But when we tried to turn it off via the switch on the dash, it didn’t turn off. I also tried using the Coach Proxy web app, which also failed, and reported an error:

This has been a problem since; we’ll probably get it looked at when we go back to Red Bay in December. In the meantime, I have to open the generator compartment (once we stop, of course) and turn it off via the switch on the generator itself. A bit of a pain.
Owensboro water tower:

Rusty twin bridges over the Ohio River:


Ohio River:

“More to Discover in Indiana”:

I-69 North:

Road to the campground:

The GPS alleged that the road had a 10 ton weight limit, but it didn’t (I knew about that ahead of time from reviews of the campground):

Pond with water lilies:

Entering the campground; no human interaction required:

We just headed to our site:


2024 travel map
Back in January I published a map of our planned travels for 2024. We’ve mostly stuck to that plan, though have changed a few stops. Here’s an updated map of our motorhome travel route this year; click or tap for a higher-resolution image:

I thought it’d be fun to share a Google Maps edition too; an interactive map with markers for our stops. Click or tap this link to view the map.
Without the above image to guide you, the east coast part of the Google map would look like a random distribution of markers!
Thousand Trails Diamond Caverns RV & Golf Resort
We stayed at Thousand Trails Diamond Caverns RV & Golf Resort in Park City, Kentucky. (Campground Reviews listing.)
Convenient to Mammoth Cave National Park, and free with our membership, but rather unlevel.
Dates:
- Check in: 2024-07-07
- Check out: 2024-07-12
- 5 nights
Weather:
- Partly cloudy, some rain
- High temps 82-90°F, lows 66-71°F
- Little wind, gusts to 19 MPH
Noise:
- No road noise
- Occasional distant train horn noise
- Minimal neighbor noise
Site:
- #503, back-in, gravel
- Needed to disconnect toad, parked in front of coach
- Rather unlevel site; high in front and passenger side; back wheels would be off the ground, so used air leveling
- Gravel driveway about 65 feet long by 22 feet wide
- Immediate neighbor on passenger side; 50 feet to neighbor on driver side
- Picnic table
- No trees
- Unclean site; cigarette butts, bottle caps, etc.
Utilities:
- 50 amp power, conveniently located
- 60 PSI water, conveniently located
- Good sewer connection, conveniently located (1 10-foot pipe needed)
Internet (in usage priority order):
- T-Mobile: 15 Mbps down, 1 Mbps up, 35 ms ping
- Verizon: 10 Mbps down, 5 Mbps up, 45 ms ping
- AT&T: 2 Mbps down, 0.01 Mbps up, 200 ms ping; unreliable
- Starlink: not used
- Campground Wi-Fi: paid, not used
Amenities:
- Garbage dumpsters
- Pool
Our review on Campground Reviews:
Close to Mammoth Cave NP
This is an older Thousand Trails campground, and like most of the older ones, it needs some serious TLC. Most sites are seasonal/annual so there were only a handful of sites available when we arrived, with most of them being either too short or on a really egregious slope (or both). We found the one site that would fit us (503) but it was so unlevel we couldn’t use our hydraulic levelers and had to use the air leveling, which is less preferred. They obviously had some serious rain recently because there were a couple of sites showing extreme erosion and I worried about the stability of the terrace they were on. But for a short stay to visit Mammoth Cave, it was serviceable. We camped at Thousand Trails Diamond Caverns RV & Golf Resort in a Motorhome.
Tip for Other Campers: There’s a new Buc-ee’s not far away and Bowling Green has pretty much everything you could want….
Campground map:

An interactive map:
Our site:


Utilities:

Air leveling, with the rear wheels raised as high as they can go (and jacks up):

Other sites:


Swimming pool:


Playground:

Mini golf:


Clubhouse and quiet room:

We probably won’t stay here again, though it’s hard to argue with free.
Video: Pigeon Forge, Tennessee to Park City, Kentucky motorhome travel timelapse
A timelapse of driving our RV, a Tiffin Allegro Bus motorhome, 227 miles from Pigeon Forge, Tennessee to Park City, Kentucky.
Travel from Pigeon Forge, Tennessee to Park City, Kentucky
We drove our coach 227 miles, about four hours of driving, from Pigeon Forge, Tennessee to Park City, Kentucky.
Here’s a map showing our route, heading northwest:

An interactive map:
Dollywood:

Gocart track:

MagiQuest:

Leaning building:

Crossover intersection:

I-40 West:

Knoxville:


Fun with zoom:

Fuel stop:

A tank or something on a truck:

Our coach:

We went to the Iron Skillet restaurant at the truck stop for lunch:


Truckers chapel:

“Enter Central Time”:

Fun with zoom:

Rest area:

Monterey:

Livingston Highway:

Paladin asleep:

Fun with zoom:

Celina Highway:

Celina:


Horses sign:

Bathroom stop at a gas station:

“Welcome to Kentucky”:

A pond:

A horse and buggy sign:

Fun with zoom:

Paladin asleep:

Entering Mammoth Cave National Park:

The RV park’s office is across the road from the campground, at the Diamond Caverns attraction:


Paladin sat on the dash for the drive from the office to the campground:

Welcome:

We untoaded here:

Following the coach:

Our site:

Integrating water filters and softener into the coach, and more
Like most RVs, our motorhome has a wet bay where one hooks up the incoming fresh water supply and drains the gray and black waste tanks. Our wet bay came with an electric hose reel, and a single filter for water quality.
Here’s what it looked like:

For a while, I’ve had an external water softener to deal with hard water in various parts of the country, and a three-stage water filter system:

But lugging those in and out of a storage bay every time we changed campsites was a bit of a pain. So I came up with a plan to get them both mounted inside the coach, so I don’t need to do that each time.
I engaged Dillon Massey of DC Plumbing & General Repair in Red Bay, Alabama to do this for me.
Here’s a rough sketch that I drew, to help explain my plan to Dillon:

A little complex, perhaps, but it seemed logical to me. The hose from the campground faucet would be attached to a connector in the wet bay, then would split to a built-in black tank flush valve and a hose to the water filters mounted in a cargo bay. The water would then go from the filters to a three-way valve to the water softener and a connector for backflushing or regenerating the water softener, with another three-way valve and connector after the softener, then on to the existing systems.
The idea of the two three-way valves and connectors was to have water normally flow from the filter through the softener and onwards, but by turning the valves and attaching an input hose to the first connector and an output hose to the second connector, I could regenerate the softener, where one adds salt to it and flushes it out (without getting salt in the rest of the system), a maintenance process I need to do every couple of weeks in hard water areas. Or by reversing those hoses, I could backflush the softener, i.e. have water flow in the reverse normal direction only through the water softener, something I need to do every three months.
These enhancements were admittedly unusual; Dillon had mounted water softeners in wet bays many times before, but had never before done valves and connectors like this to backflush and regenerate. Normally, people would disconnect and remove the water softener when doing those servicing operations, but I wanted to be able to do it more easily.
In preparation for the work, while staying at Red Bay Acres, I cleared out the plumbing bits from the wet bay and nearby cargo compartment:

Dillon removed panels at the top of the wet bay, moved the electrical outlet, and removed the hose reel, which I didn’t want anymore, both to provide space for the water softener, and because I didn’t use it anyway; I preferred to connect a more flexible hose:

The removed panels; I had the idea to reverse them from how they were before, which provided more space in the wet bay, enabling adding salt to the water softener more easily (compare the picture of the wet bay at the start of this post to how it looks at the end of this post):

There wasn’t room in the wet bay for the three-stage water filters, so my plan was to install them in the nearby cargo bay, mounted on the wall (to avoid interfering with the cargo slide):

Here are the fllters installed there, with hoses connecting to the wet bay:

He also added a valve to connect the water system directly to the black tank flush, so I don’t need to connect a hose to rinse out the black tank, though the valve is a little hard to reach:

The three-way valves and connectors; unfortunately the spacing wasn’t ideal, so the left valve only barely cleared the right connector, but it was usable:

Dillon’s mods completed, with new three-way valves and connectors installed in the top panel, the water softener mounted inside the wet bay:

Unfortunately, when I tested the connections later, I discovered that they didn’t match my specifications. Here’s a sketch over a picture of the wet bay, showing how I suspected that the connections were misconfigured:

This meant that while it was fine in the normal (horizontal) valve positions, when turning the valves to the regen/backflush positions (vertical), the left one would connect between the incoming water and the connector, instead of the water softener input and connector. And similarly, the right valve would connect between the rest of the coach and the connector, instead of the water softener output and connector, as it should.
So I sketched how I want to fix that, plus also rearranging the valves and connectors to make them fit better, and adding an easier to reach valve for the black tank flush:

While at NIRVC in the DC area, I got them to make those changes:


They successfully reversed the positions of the left valve and connector, though couldn’t rotate it 90° as requested, so instead trimmed the valve handle to fit better in the space.
Regenerating the water softener involves adding two containers of salt to the top of the unit, which I can do without having to remove it from the wet bay:

Here are the valves in the regenerating configuration, with the input hose connected on the left and the output on the right:


And here are the valves in the backflushing configuration, with the input water on the right, and output on the left:


Much easier. Unfortunately, this saga isn’t quite over: while this works, filling the water tank gets really slow after regenerating. I suspect that the water filters are in the incorrect place in the circuit, so they are getting clogged with the salt. We’ll be back in Red Bay in December, so I’ll get Dillon to investigate and fix it then. In the meantime, I’ll have to disconnect the output of the water softener and connect a hose to it, to avoid this issue. Annoying, but not too difficult.
And when doing that, I discovered that even with the water pump on, no water would flow inside the coach when diverting the softener output. Which tells me that these modifications are after the tank, not before as they should be. The way I designed it, using the valves shouldn’t have any impact on pumping water from the tank into the coach.
Finally, here’s the normal configuration of the valves, where water flows through the filters and softener into the coach. Notice also the new black tank flush valve in the upper-left, that makes it super easy to rinse out the black tank (we kept the valve Dillon installed too, just visible in the lower-right, as a backup):

And notice also the normal water input connector:

I really appreciate not needing to lug the water filters and softener every time we change campsites. And while the regeneration and backflush options still aren’t quite right, I still think they were an excellent idea; I look forward to them working as designed.
Update: after much investigating, I determined that the valves and connectors were okay, just reversed from how I specified. So I was able to simply rotate the water softener, so the input and output were reversed, and swap the labels on the new valves, and now the system works properly. Yay!