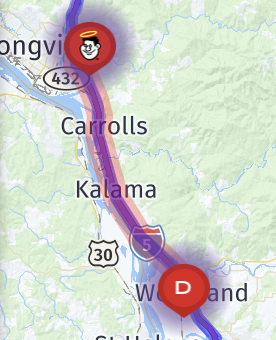
Travel from Pigeon Forge, Tennessee to Park City, Kentucky

We drove our coach 227 miles, about four hours of driving, from Pigeon Forge, Tennessee to Park City, Kentucky.

Here’s a map showing our route, heading northwest:

Route map

An interactive map:

Dollywood:

Dollywood

Gocart track:

Gocart track

MagiQuest:

MagiQuest

Leaning building:

Leaning building

Crossover intersection:

Crossover intersection

I-40 West:

I-40 West

Knoxville:

Knoxville

Knoxville

Fun with zoom:

I-40 West

Fuel stop:

Fuel stop

A tank or something on a truck:

Tank

Our coach:

Our coach

We went to the Iron Skillet restaurant at the truck stop for lunch:

Iron Skillet restaurant

Menu

Breakfast for lunch

Truckers chapel:

Truckers chapel

“Enter Central Time”:

Enter Central Time

Fun with zoom:

Fun with zoom

Rest area:

Rest area

Monterey:

Monterey

Livingston Highway:

Livingston Highway

Paladin asleep:

Paladin asleep

Fun with zoom:

Fun with zoom

Celina Highway:

Celina Highway

Celina:

Celina

Celina

Horses sign:

Horses

Bathroom stop at a gas station:

Bathroom stop at gas station

“Welcome to Kentucky”:

Welcome to Kentucky

A pond:

Pond

A horse and buggy sign:

Horse and buggy

Fun with zoom:

Fun with zoom

Paladin asleep:

Paladin asleep

Entering Mammoth Cave National Park:

Entering Mammoth Cave National Park

The RV park’s office is across the road from the campground, at the Diamond Caverns attraction:

Diamond Caverns

Diamond Caverns

RV office

Our coach

Paladin sat on the dash for the drive from the office to the campground:

Paladin on dash

Welcome:

Welcome

We untoaded here:

We untoaded here

Following the coach:

Following coach

Our site:

Our site

Integrating water filters and softener into the coach, and more

Like most RVs, our motorhome has a wet bay where one hooks up the incoming fresh water supply and drains the gray and black waste tanks. Our wet bay came with an electric hose reel, and a single filter for water quality.

Here’s what it looked like:

Wet bay

For a while, I’ve had an external water softener to deal with hard water in various parts of the country, and a three-stage water filter system:

Water softener and filters

But lugging those in and out of a storage bay every time we changed campsites was a bit of a pain. So I came up with a plan to get them both mounted inside the coach, so I don’t need to do that each time.

I engaged Dillon Massey of DC Plumbing & General Repair in Red Bay, Alabama to do this for me.

Here’s a rough sketch that I drew, to help explain my plan to Dillon:

Sketch

A little complex, perhaps, but it seemed logical to me. The hose from the campground faucet would be attached to a connector in the wet bay, then would split to a built-in black tank flush valve and a hose to the water filters mounted in a cargo bay. The water would then go from the filters to a three-way valve to the water softener and a connector for backflushing or regenerating the water softener, with another three-way valve and connector after the softener, then on to the existing systems.

The idea of the two three-way valves and connectors was to have water normally flow from the filter through the softener and onwards, but by turning the valves and attaching an input hose to the first connector and an output hose to the second connector, I could regenerate the softener, where one adds salt to it and flushes it out (without getting salt in the rest of the system), a maintenance process I need to do every couple of weeks in hard water areas. Or by reversing those hoses, I could backflush the softener, i.e. have water flow in the reverse normal direction only through the water softener, something I need to do every three months.

These enhancements were admittedly unusual; Dillon had mounted water softeners in wet bays many times before, but had never before done valves and connectors like this to backflush and regenerate. Normally, people would disconnect and remove the water softener when doing those servicing operations, but I wanted to be able to do it more easily.

In preparation for the work, while staying at Red Bay Acres, I cleared out the plumbing bits from the wet bay and nearby cargo compartment:

Cleared out plumbing bits

Dillon removed panels at the top of the wet bay, moved the electrical outlet, and removed the hose reel, which I didn’t want anymore, both to provide space for the water softener, and because I didn’t use it anyway; I preferred to connect a more flexible hose:

Removed panels and hose reel

The removed panels; I had the idea to reverse them from how they were before, which provided more space in the wet bay, enabling adding salt to the water softener more easily (compare the picture of the wet bay at the start of this post to how it looks at the end of this post):

Panels

There wasn’t room in the wet bay for the three-stage water filters, so my plan was to install them in the nearby cargo bay, mounted on the wall (to avoid interfering with the cargo slide):

Storage bay

Here are the fllters installed there, with hoses connecting to the wet bay:

Filters

He also added a valve to connect the water system directly to the black tank flush, so I don’t need to connect a hose to rinse out the black tank, though the valve is a little hard to reach:

Black tank flush valve

The three-way valves and connectors; unfortunately the spacing wasn’t ideal, so the left valve only barely cleared the right connector, but it was usable:

Three-way valves

Dillon’s mods completed, with new three-way valves and connectors installed in the top panel, the water softener mounted inside the wet bay:

Red Bay mods completed

Unfortunately, when I tested the connections later, I discovered that they didn’t match my specifications. Here’s a sketch over a picture of the wet bay, showing how I suspected that the connections were misconfigured:

Sketch

This meant that while it was fine in the normal (horizontal) valve positions, when turning the valves to the regen/backflush positions (vertical), the left one would connect between the incoming water and the connector, instead of the water softener input and connector. And similarly, the right valve would connect between the rest of the coach and the connector, instead of the water softener output and connector, as it should.

So I sketched how I want to fix that, plus also rearranging the valves and connectors to make them fit better, and adding an easier to reach valve for the black tank flush:

Sketch

While at NIRVC in the DC area, I got them to make those changes:

Wet bay

Wet bay

Wet bay

Wet bay

Work in progress

They successfully reversed the positions of the left valve and connector, though couldn’t rotate it 90° as requested, so instead trimmed the valve handle to fit better in the space.

Regenerating the water softener involves adding two containers of salt to the top of the unit, which I can do without having to remove it from the wet bay:

Regenerating configuration

Here are the valves in the regenerating configuration, with the input hose connected on the left and the output on the right:

Regenerating configuration

Regenerating configuration

And here are the valves in the backflushing configuration, with the input water on the right, and output on the left:

Backflushing configuration

Backflushing configuration

Much easier. Unfortunately, this saga isn’t quite over: while this works, filling the water tank gets really slow after regenerating. I suspect that the water filters are in the incorrect place in the circuit, so they are getting clogged with the salt. We’ll be back in Red Bay in December, so I’ll get Dillon to investigate and fix it then. In the meantime, I’ll have to disconnect the output of the water softener and connect a hose to it, to avoid this issue. Annoying, but not too difficult.

And when doing that, I discovered that even with the water pump on, no water would flow inside the coach when diverting the softener output. Which tells me that these modifications are after the tank, not before as they should be. The way I designed it, using the valves shouldn’t have any impact on pumping water from the tank into the coach.

Finally, here’s the normal configuration of the valves, where water flows through the filters and softener into the coach. Notice also the new black tank flush valve in the upper-left, that makes it super easy to rinse out the black tank (we kept the valve Dillon installed too, just visible in the lower-right, as a backup):

Normal configuration

And notice also the normal water input connector:

Normal configuration

I really appreciate not needing to lug the water filters and softener every time we change campsites. And while the regeneration and backflush options still aren’t quite right, I still think they were an excellent idea; I look forward to them working as designed.

Update: after much investigating, I determined that the valves and connectors were okay, just reversed from how I specified. So I was able to simply rotate the water softener, so the input and output were reversed, and swap the labels on the new valves, and now the system works properly. Yay!

Camp Margaritaville RV Resort and Lodge

We stayed at Camp Margaritaville RV Resort and Lodge in Pigeon Forge, Tennessee. (Campground Reviews listing.)

One day we’ll learn that staying at resorts is a waste of money for us, but it was not this day.

Dates:

  • Check in: 2024-06-30
  • Check out: 2024-07-07
  • 7 nights

Weather:

  • Partly cloudy, some rain
  • High temps 83-91°F, lows 64-73°F
  • Negligible wind, gusts to 12 MPH

Noise:

  • No road noise
  • No train horn noise
  • Some neighbor noise (mostly kids)
  • Nightly fireworks at nearby Dollywood

Site:

  • #84, back-in, concrete
  • Needed to disconnect toad, parked behind coach
  • Somewhat unlevel site (surprisingly for concrete; high on front and passenger side; used hydraulic leveling
  • Concrete driveway about 50 feet long by 18 feet wide
  • 25 feet to neighbors on both sides
  • Picnic table
  • Fire pit
  • A couple young trees
  • Clean site

Utilities:

  • 50 amp power, conveniently located
  • 50 PSI water, conveniently located
  • Good sewer connection, conveniently located (1 10-foot pipe needed)

Internet (in usage priority order):

  • T-Mobile: 25-55 Mbps down, 4 Mbps up, 65 ms ping
  • AT&T: 90 Mbps down, 9 Mbps up, 90 ms ping
  • Verizon: 15-24 Mbps down, 2 Mbps up, 90 ms ping
  • Starlink: not used
  • Campground Wi-Fi: not used

Amenities:

  • Garbage pickup from site
  • Pools
  • Restaurant (in theory with to-site delivery, but that didn’t work when we tried it)

Our review on Campground Reviews:

Nice resort near Great Smoky Mountain NP

We’re not “resort” people, but this one was nice. It was the nicest-looking resort close to the entrance to Great Smoky Mountain National Park and far enough off the main road, so it was reasonably quiet. The sites are all concrete pads, so you’d expect them to be level, which ours was not. Weird, but not a problem. We were down in “the valley,” which is the farthest you can get to the resort amenities, but that probably contributed to it being quieter. Our site was spotless, and all the utilities worked well. I loved being able to go up to the restaurant for coconut shrimp and a margarita (super spendy, but a bonus nonetheless). We camped at Camp Margaritaville RV Resort and Lodge in a Motorhome.

Campground map:

Map

An interactive map:

Our site:

Our site

Our site

Our site

Our site

Griddle:

Griddle

Utilities:

Utilities

Our site and others:

Our site and others

Other sites

Other sites

Other sites

Other sites

Other sites

Other sites

Other sites

Other sites

Bathhouse:

Bathhouse

Lodge:

Lodge

Restaurant dinner menu:

Restaurant menu

Restaurant menu

Fancy fried green tomatoes:

Fancy fried green tomatoes

Burger and coconut shrimp, plus margaritas:

Burger etc

Lodge:

Lodge

Lodge

Foyer:

Foyer

Breakfast buffet:

Breakfast buffet

Breakfast buffet

Breakfast buffet

Pool area:

Pool area

Pool area

Pool area

A nice resort, and we do appreciate an on-site restaurant, but we’re not really into other resort facilities. We probably won’t stay here again.

Travel from Beaver, West Virginia to Pigeon Forge, Tennessee

We drove our coach 246 miles, about four hours of driving, from Beaver, West Virginia to Pigeon Forge, Tennessee.

Here’s a map showing our route, heading west:

Route map

An interactive map, showing potential stops:

We had no sewer hookup at our campsite; when we were ready to leave our gray and black tanks were both at 83%:

83% gray and black tanks

So we stopped by the dump station on the way out:

Dumping waste tanks

A very narrow road out of the park:

Narrow road

Of course, as we head out of West Virginia, we had to play John Denver’s Take Me Home, Country Roads:

John Denver's Take Me Home, Country Roads

Country roads:

Country roads

Fun with zoom:

Fun with zoom

Fun with zoom

South on I-77:

South on I-77

5% downgrade; nice to have actual hills for a change:

5% downgrade

East River Mountain tunnel:

East River Mountain tunnel

East River Mountain tunnel

East River Mountain tunnel

“Welcome to Virginia”:

Welcome to Virginia

Rest stop:

Rest stop

Big Walker Mountain tunnel:

Big Walker Mountain Tunnel

Big Walker Mountain Tunnel

Big Walker Mountain Tunnel

Fun with zoom

A colorful water tower, painted to look like a hot air balloon:

Colorful water tower

Fuel stop:

Fuel stop

Fuel stop

Sbarro for lunch:

Sbarro for lunch

Back to our coach:

Back to our coach

An accident ahead:

Accident ahead

Accident

“Tennessee Welcomes You”:

Tennessee Welcomes You

Rest area:

Rest area

Heading in to Pigeon Forge:

Fun with zoom

Titanic:

Titanic

Hollywood Wax Museum:

Hollywood Wax Museum

MagiQuest:

MagiQuest

Swimwear and alligators:

Swimwear etc

Camp Margaritaville:

Camp Margaritaville

Check in:

Check in

Arriving at our site:

Our site

Custom couch side tables

While in Red Bay we also got Cody Poores of Cody’s Custom Cabinets to create custom side tables for our theater seating couch.

We already had nice side tables that we bought from Dave & LJ’s RV Interior Design in Woodland, Washington, along with our couch. Here’s the one on Jenn’s side of the couch, next to the kitchen pull-out counter and drawers:

Side table

And my side, using the top drawer as a surface for my iPad:

Side table

They were nice, but we wanted ones that were sized better for the space, matched the look of built-in cabinets, and had a better pull-out surface on top. Cody was able to produce custom units to match our requirements.

Here he’s removing the old units:

Side table

Side table

Jenn’s new unit, without the top; you can see the pull-out surface:

Side table

My unit installed:

Side table

The pull-out surface is very useful for resting my iPad and MacBook Pro:

Side table

Jenn’s unit:

Side table

Hers also has the pull-out surface and two drawers:

Side table

Side table

Much better!

Little Beaver State Park

We stayed at Little Beaver State Park in Beaver, West Virginia. (Campground Reviews listing.)

A nice state park near New River Gorge National Park.

Dates:

  • Check in: 2024-06-23
  • Check out: 2024-06-30
  • 7 nights

Weather:

  • Partly cloudy, some rain
  • High temps 77-88°F, lows 55-64°F
  • Little wind wind, gusts to 21 MPH, sheltered by trees

Noise:

  • No road noise
  • No train horn noise
  • Negligible neighbor noise

Site:

  • #19, pull-through, gravel
  • Didn’t need to disconnect toad, parked behind and in front of coach
  • Somewhat unlevel site, high in front and driver side; used hydraulic leveling
  • Gravel driveway about 100 feet long by 10 feet wide
  • 20 feet to neighbor on front/passenger side; 30 feet to road on driver side
  • Picnic table
  • Fire pit
  • Tall trees
  • Clean site

Utilities:

  • 50 amp power, very conveniently located
  • 80 PSI water, conveniently located
  • No sewer

Internet (in usage priority order):

  • T-Mobile: 6 Mbps down, 12 Mbps up, 60 ms ping
  • AT&T: 1 Mbps down, 0.1 Mbps up, 90 ms ping
  • Verizon: 15 Mbps down, 4-6 Mbps up, 38 ms ping
  • Starlink: not used
  • Campground Wi-Fi: none

Amenities:

  • Garbage dumpsters
  • Dump station

Our review on Campground Reviews:

Good base for New River Gorge

This is a nice state park conveniently located near New River Gorge National Park and not far from the freeway. A word of caution, however: the road to get to the park and the roads in the park are not for the faint of heart, whether you have a small or big rig. The way in from the north is slightly less heart-stopping but still not ideal. Site 19 was a pull-through with a steep driveway and a relatively flat area about halfway, which was just perfect for our 40′ motorhome and tons of room to park our tow vehicle either in front or behind. We camped at Little Beaver State Park in a Motorhome.

Park campground and trail map:

Map

An interactive map:

Our site:

Our site

Our site

Our site

Our site

Our site

Our site

Our site

Our site

Our site

Our site

Completed another row of National Park stickers:

National Park stickers

A lightning storm during our stay:

Lightning map

This site didn’t have any sewer connection. After a week, our gray tank was at 71%, and black tank at 63%:

71% gray and 63% black tanks

Squirrel:

Squirrel

Squirrel

White-Marked Tussock Moth caterpillar:

Catapiller

Catapiller

Other sites:

Other sites

Other sites

Other sites

Other sites

Other sites

Other sites

Other sites

Other sites

Other sites

Other sites

Office:

Office

Registered campers only:

Registered campers only

Playground:

Playground

Cabin:

Cabin

Bathrooms:

Bathrooms

We’d be happy to stay here again.

Travel from College Park, Maryland to Beaver, West Virginia

We drove our coach 314 miles, about five hours of driving, from College Park, Maryland to Beaver, West Virginia. The beginning of our westward migration, heading towards our home base in Washington state.

Here’s a map showing our route, heading west:

Route

An interactive map:

Toading up:

Toading up

I-495:

I-495

Church

I-495

Welcome to Virginia:

Welcome to Virginia

Paladin in his high place:

Paladin in his high place

I-64:

I-64

I-66:

I-66

Fuel stop:

Fuel stop

Fuel stop

Tiffin Phaeton motorhome:

Tiffin Phaeton motorhome

Apples on water tower:

Apples on water tower

We were going to park and have lunch at the fuel stop, but there wasn’t any parking that would work for us, so we continued on. There wasn’t any room at the next rest area either:

Rest area

So I made lunch on the road:

Lunch

A later rest area:

Rest area

Rest area

I-64:

I-64

I-64

I-64

Welcome to West Virginia:

Welcome to West Virginia

Of course, we had to play John Denver’s “Take Me Home, Country Roads” while entering the state:

Take Me Home, Country Roads

Rest area:

Rest area

Rest area

I-64 hill:

I-64 hill

I-64

7% grade:

7% grade

Sandstone Mountain elevation 2,765 feet:

Sandstone Mountain elevation 2765 feet

Little Beaver State Park:

Little Beaver State Park

Narrow sloping curve:

Narrow sloping curve

Little Beaver State Park

Narrow entrance:

Narrow entrance

Lake:

Lake overflow

Lake

Very narrow road to campground:

Narrow road to campground

Narrow curvy road

Campground office:

Check-in office

Guided to our site:

Guided to our site

Custom desk

Our motorhome came with a couple of couches opposite each other, which we removed before even moving into the coach.

We replaced the passenger-side couch with a cheap desk in 2021, then in 2022 we replaced the desk with IKEA drawers and cupboards. and Jenn used a height-adjustable platform on the end of the dining table.

While in Red Bay earlier in 2024, we had Cody Poores of Cody’s Custom Cabinets build a custom desk for us, based on my design. We wanted a built-in desk that matched the existing cabinetry, didn’t take up too much space on travel days, but expanded when in use. Plus included a space for Paladin’s litter box. Here’s my design:

Desk design sketch

A timelapse video of drawing the design using Linea Sketch on my iPad Pro with Pencil:

The empty space after removing the IKEA cabinet; the main TV is on a televator, inside that cabinet below the window:

Empty space

A nice thing about Cody’s service is that he comes to you at your campsite in Red Bay. Here’s the new desk arriving at the end of the week:

Desk arriving

Being brought inside:

Being brought inside

Desk

My design included a TV lift for the computer monitor. We supplied the lift mechanism. Here it’s being mounted:

Mounting monitor lift

Back of the new cabinet, with the monitor lift area and cupboards on the left, drawers in the middle, and the cat litter area on the right:

Backside

Backside

The desk in place, without desktops (and with the main TV raised):

Desk in place

Desk in place

A closer look at the cupboard and monitor lift area without the desktops:

Cupboard without desktop

The right-hand pull-out desktop installed:

Desktop in place

The left desktop also in place:

Left desktop in place

Desk

The new computer monitor (Apple Studio Display) raised, still wrapped:

Monitor raised

The completed desk with the coach slide-outs in for travel:

Desk with slides in

We store the desk chair by the dining table for travel, and stack the dining chairs:

Desk with slides in

Looking down the back at the monitor lift and cables:

Monitor lift

A couple of grommets for wires:

Grommets for wires

Wires behind the drawers between the two grommets:

Wires behind drawers

A side view of the monitor lift:

Monitor lift

Cupboards:

Cupboards

Cat litter bin and litter box on a drawer slide, so it can be easily pulled out for cleaning:

Cat litter bin and box on slide

Jenn’s typical work setup:

Work setup

Work setup

Work setup

When work is done, the monitor can be lowered and desktop closed, and the main TV raised:

TV

There are a couple of Velcro patches inside the desk, and corresponding patches on Jenn’s work and personal laptops, so they can be stored on travel days without sliding around:

Monitor down

Laptops stored

Travel mode:

Travel mode

A huge improvement.

(Update: we got Cody to tweak the desk a bit on our next visit to Red Bay; look out for a blog post about that in 2025.)